Tuesdays with Dorie: Challah

Oh, Hello!

I know its been a while. I’ve been baking. but not blogging or taking pictures. Life has been  CRAZY. My boys started kindergarten in August. So, I’ve got three kids in three different classes, and that means 3 different teachers who want my time. Which is a lot. Plus, I’m training for another marathon, and planning another Ragnar Relay. so, I’m busy. But hopefully I’ll be back here more often. Gotta get back into the habit..

So, that brings us to this week’s assignment: Challah. I’ve baked this one before, and I bake challah almost every week for french toast or for my synagogue. My standard recipe is from Marcy Goldman and uses fresh yeast. This recipe isn’t really all that different except that it uses milk and butter. Which makes this bread delicious. BUT it makes the bread dairy (duh). But people who keep kosher don’t mix meat and milk, and challah is traditionally served at shabbat dinner. In most homes Shabbat dinner is a meat meal–soup, roast chicken, etc. And so a bread with milk and butter in it just won’t fly.

I mixed it up this morning when I realized that we were running low on french toast. I managed to get it all kneaded together before we left for school and popped it in the fridge to rise. In the evening I braided it, let it rise and baked it off.
Untitled

of course, my house smelled delicious.

I sliced into it today to taste it with some butter. It was delicious. Tomorrow it’ll turn into about 20 slices for French toast.

To see some other lovely examples of this challah, visit the LYL post at Tuesdays with Dorie


Tuesdays With Dorie: Savory Brioche Pockets

This weeks assignment was to make ‘savory brioche pockets’. Brioche pockets filled with carmelized onions, mashed potatoes, goat cheese, chives and asparagus tips.
I made the brioche on Thursday, let it rise overnight and made the ‘pockets’ on Friday and enjoyed one for lunch with a big salad on Friday.
The brioche is not difficult, I made it once before when we made the pecan sticky buns. I liked the brioche much better in this application than I did in the sticky buns. That was just TOO sweet and TOO buttery!

Make the sponge
let it rise
make the dough–incorporating all that butter never seems like its going to work
knead it forever
let it rise
deflate
Rest in fridge for at least 8 hours. Mine got at least 20 hours

I decided to make 4 pockets and turn the balance of the dough into loaves of brioche

The recipe suggests cutting circles out of the dough and forming them into circular pockets. I’m more familiar with making borekas, which are an empanada style pocket, and its all one piece. I went with what I knew
Untitled
I cut off a piece of dough, rolled it out into a round (okay, they usually look like amoebas.) On one half of my amoeba, I layered onions, the potato/goat cheese/chive mixture, and two lightly cooked asparagus tips. Then, I folded the empty half over and sealed it up and put it on a sheet to rise. I made 4 in total and put three of them directly into the freezer for future good eating (tomorrow, perhaps, or maybe for dinner tonight)
Untitled
When it had risen long enough, I brushed it with some egg wash and sprinkled on some poppy seeds and coarse salt. Into the oven it went. Out came deliciousness
Untitled
I didn’t forget about the other 2/3 of the dough! I divided it into 12-roughly equal sized blobs and put 6 into each baking tin. I put both tins in my ‘proofing box’ (the microwave with the door cracked open so the light stays on)and popped them in the oven when I ran out of time. What came out were some of the most amazing bread I’ve ever baked. Really–more like cake than bread. One of those loaves went into the freezer too.
Untitled
It was insanely delicious with butter. Insane!
You’ll be able to see other people’s work at the LYL (leave your link) post at Tuesdays With Dorie. Carrie at Loaves and Stitches is our host for the week, and you’ll be able to find the recipe at her blog.

And you should totally make this. It was a really satisfying-and fancy-lunch. It wasn’t difficult. If you’re not into the ‘pockets’ just make the brioche. It’s really good too!

Tuesdays With Dorie: Rustic Potato Bread

So, I made this bread a few days late. The post was ‘due’ on the last day of passover. So, I made it yesterday.

For such a beautiful loaf of bread, it was incredibly simple to bake. I wish I had read the instructions completely before getting started, because then I would have known that the dough starts out crumbly….like a pie crust….and then miracously comes together like a bread dough. I added a few tablespoons of water while it was still crumbly, and then ended up having to add extra flour while I was kneading it. No big deal. I don’t think it affected the flavor one bit. I halved the recipe and did the whole thing by hand. My mixer is much too big to bother with for only one loaf of bread. I didn’t mind, kneading it was my arm workout for the day–I couldn’t get to the gym since I was home with a sick child.

After two short rises, I ended up with this beautiful loaf of bread.
Untitled
It was delicious plain, and with butter.
Untitled
I’ll definitely be making this again. it was easy, delicious and impressive looking!

Check out the other loaves of potato bread that were produced this week at our Leave Your Link post. The recipe can be found at Dawn’s blog, Simply Sweet. While you’re there, make sure to look at the picture of the “high heeled shoe cupcakes” that she made. They’re stunning. She has the recipe for the bread, or you can find it on page 138 of Baking with Julia.

Tuesdays With Dorie: Foccacia

This week’s assignment was to make Foccacia, a delicious Italian flat-ish bread. It was relatively easy, but required lots of time–but very little attention.
The dough was easy to put together, water, yeast, salt, olive oil and flour kneaded together for about 10 minutes to make a beautiful dough. Then an hour and a half rise. Then it was folded up on itself to deflate it, and then another short rise. Then the dough was divided into three lumps, placed into an oiled ziplock bag, and stashed in the fridge for a 24-36 hour rest.
Untitled
The long cold rise produced lots of tiny bubbles and a tangy flavor. Of course I forgot to take a picture of the dough after it came out of the fridge. It had risen again, and you could see the matrix of bubbles in the dough.

When I was ready to bake it the next evening I pressed it onto a parchment lined baking sheet. The recipe called for chopped fresh herbs, which I didn’t have–so I used sea-salt on two of them and magic salt on the other.
Untitled
Magic salt is a delicious combination of kosher salt, garlic, rosemary and sage. It all goes into the food processor to chop up the garlic and herbs with the salt and then it’s poured onto a rimmed baking sheet to dry (either by leaving it out or in a low oven–I had to use the oven for mine because it was extremely humid when I made it). The salt can be used to flavor roasted vegetables, meat, and apparently Foccacia. It was the clear winner for me over the one that just had olive oil and sea salt.
Untitled
The bread didn’t have the loose bubbly texture I expected–the bubbles were small and evenly distributed– but I’m not sure it mattered. It was light and heavily flavored with olive oil, salt and herbs. I would definitely make it again, and I wonder how it would work as a pizza dough. Perhaps as a loosely made pan/Sicilian pizza.

I served the bread with dinner one night last week. Leftover lasagne, the foccacia and collard greens with garlic.
Untitled
Check out the host’s post on this recipe at Sharmini’s blog, Wandering Through. The recipe can be found there, as well as on page 143 of the book.
And take a look at the Leave Your Link link (LYL) at Tuesdays with Dorie. If you’ve got a hankering for good bread, and an excuse to make this (and a little bit of time) you should.

The next Tuesdays With Dorie will feature Boca Negra. All I can say about that is wow. Stay tuned for that one!

Tuesdays With Dorie: Bagels

This week, our assignment is to bake bagels. I’ve done this before, though not from this recipe.

I have used Smitten Kitchen’s recipe a few times, which came from Peter Reinhardt (the bread baker’s apprentice, I think). Like this recipe, it’s also a two day affair, but it uses a sponge, then you make the dough, then rise, then make the bagels and let them chill out in the fridge until the next morning.
This recipe is simpler. There’s no sponge, and it is nice to eliminate a step. I put the dough together before making dinner on Saturday night. It only took a few minutes and I didn’t take any pictures because you’ve all seen me make bread dough before.

I decided that I’d finish the bagels before lunch on Sunday. I divided the dough in half and left one half in the fridge while I produced bagels from the other half. I divided that half into 5 roughly equal pieces, and made a ‘purse’ before making a hole in the middle and then shaping them into bagels:
IMG_1670
I placed the unboiled and unrisen bagels on a floured towel
IMG_1663
before boiling them off, a few at a time. I let them boil for about 30 seconds on each side once they floated to the surface
IMG_1667
Then they rested and drained for a moment on a non-floured towel and then onto the parchment-lined baking sheet they went to be brushed with egg and then topped (or not)
IMG_1669
They went into a 500 degree oven with some ice cubes and water to produce steam, the temperature was immediately turned down to 450, and they baked for 25 minutes. Then the oven was turned off and they sat for 5 minutes. And then the oven door was opened and they sat, still in the oven, for another 5 minutes.

And then I began the process again with the second set of bagels that were still to be shaped.
IMG_1677
Then I had to re-heat the oven for the 2nd batch. Really, my biggest problem with the recipe is the part where I had to keep the oven door open for 5 minutes. Its still summer here in Florida and that really heated the kitchen up. Clearly, the next time I do this, it will be the dead of winter, when I don’t mind extra heat in the kitchen. But on a 90 degree (or more) day, I really don’t want to be heating my kitchen up like that.

Other than that complaint, its a good recipe. The next time I make them, I’ll add whole wheat flour into the mix.

I sliced the un-eaten bagels and put them in the freezer the same day I baked them. Since then I’ve been taking one half of a bagel out every morning, letting it defrost slightly and then toasting it a little. Then I butter it, cut it in half and put it in Dorothy’s lunch box. I ate half an onion bagel the other morning for breakfast, toasted with cream cheese. It was still delicious.

If you like bagels (and lets face it, who doesn’t?) you should try to make your own at least once, and this is a good recipe to start with. I’ve baked bagels at least 3 times now, and my kids and husband get a huge kick out of it. You can find the recipe on page 87 of Baking With Julia, and check out our host for the week, Heather, who blogs at Heather’s Bytes. She’ll have the recipe posted as well. There will be lots of delicious bagely posts at our home base, Tuesday’s with Dorie.

Baking for the Soul: Challah

There’s no easy way to say this, my grandmother (Nona) is almost 90 and not doing very well. She’s in the hospital refusing to eat and drink and take her medications. Some people eat when they’re sad, today I’m baking. Challah. There is nothing more comforting to me than a house that smells from freshly baked bread.
IMG_1453
Challah is an egg-enriched bread that is served on Shabbat and Holidays. Its slightly sweet and very delicious. It makes great french toast. The recipe that I use is from the Ratner’s Meatless Cookbook. Ratner’s was a famous dairy resturant in New York. I was lucky enough to eat there once in high school. I’m fairly certain that I made sure to taste their challah, and I’m also fairly certain that I remarked that the one we make is better—even though its from their recipe.

My mother made this recipe when I was a kid, not quite every week, but very frequently. And while we don’t ‘do’ shabbat every weekend, I make this quite frequently. Its actually the only recipe in the book that I’ve ever used. The book opens quite naturally to the challah page. Over the years I’ve found challah recipes that I like and use every now and then….a whole wheat challah that makes enough for several weeks of challot, a lovely pumpkin challah for the fall, and a wonderful recipe in the Baking with Julia book, but I always come back to the original recipe. This one from Ratner’s.
IMG_1450
I mentioned that this is an egg-enriched bread. Most challah recipes that you see call for one or two eggs. Not this one. This recipe calls for 2 whole eggs and then 1/3 cup of egg yolks. Today it took 5 yolks to fill 1/3 cup (but I was using eggs from my friend Tisha’s hens–it usually only takes 3 or maybe 4 to fill 1/3 cup with ‘large’ eggs) This is a very rich bread
IMG_1438
Challah
Delicious. This challah gets rave reviews whenever I serve it to guests or bring it to someone else’s house. Makes one large or 2 smaller loaves.

2 packages active dry yeast (or 4 1/2 tsp)
2/3 cup lukewarm water
1/2 cup whole eggs (usually 2)
1/3 cup egg yolks (usually 4)
7 Tbs vegetable oil
1/4 cup sugar
2 tsp salt
4 1/2-5 cups all purpose flour
1 egg, well beaten, for wash
sesame or poppy seeds (optional, for topping)

  1. In a large bowl, soften yeast in the warm water, add a little bit of the sugar to get things moving. Once the yeast is active, stir in eggs, yolks, oil, remaining sugar and salt. Add enough flour to form a stiff, sticky dough.
  2. Knead dough on a floured surface until smooth and elastic. About 5 minutes
  3. Place in a greased bowl and turn to coat. Let rise, covered, in a warm place until doubled in bulk. About 2 hours
  4. Punch down, knead again and divide dough into strips. Braid into one or two loaves.
  5. Cover and let rise again until doubled…about 45 minutes. Brush with egg wash and top with seeds, if desired.
  6. bake at 375 until richly browned. bake for 35-40 minutes for one loaf, less for two. Cool thoroughly before slicing
  7. This bread freezes really well. Wrap in saran wrap and then aluminum foil. I’ve kept loaves in the freezer for months and had them emerge just as delicious as the day they went in.

Tuesdays with dorie: semolina bread

This week’s assignment is to make Semolina Bread. Semolina is also called ‘durum wheat’ and can be used to make pasta. I was lucky enough to find it in the bulk bin of my local organic supermarket, so I was able to just buy what I needed for the recipe, otherwise I’d be stuck with a bag of this, and not really have plans for what to do with the rest. The bread was good, but time consuming, so I’m not sure that it will go into my regular rotation of bread recipes.

Even though it was time consuming–3 rises, each 2 hours long–none of the steps were complicated, and they were each completed in about 5 minutes. I just had to be around to do it.

First, there was a sponge to make. A cup of water, a cup of flour and some yeast all went into the bowl, mixed and covered….and then it sat for 2 hours. Here’s the before and after:
DSC_0016 DSC_0024
Big change, huh? Once it was bubbly and active, I stirred in semolina flour, a little bit more white flour, salt and olive oil and started kneading. Since I was only making one loaf and the quantities were so small, I didn’t even bother with my mixer or cuisinart. They’re both so big that this tiny loaf of bread would have gotten lost. I ended up needing to add more flour than the recipe called for. It said that the dough would be sticky, but I didn’t want it to end up like a pancake once I shaped it for the 3nd rise. Here it is, all mixed and kneaded and ready to rise for two hours
DSC_0027 I picked my daughter up from Art Camp and had some frozen yogurt and then came back home to shape it and let it rise again. DSC_0028 The recipe instructs us to slash the loaf with a single edge razor blade….which I don’t have, so I used a knife. Big mistake. I should have just skipped it. the knife pulled the dough and partially deflated my beautiful loaf. It could have been worse. You can see the damage I inflicted in the finished loaf:DSC_0031. It was delicious, and the kids enjoyed it too. I served this with a big salad and a bowl of pasta with some really great tomato sauce.
DSC_0033
The only change I made was to decrease the salt to 1T. The recipe called for two, but some of the people who baked it before me were reporting that it was very salty. With half the salt, it was fine, I don’t think I would want more salt in this bread.

Our hosts for this recipe are Renee at The Way to My Family’s Heart and Anna at Keep it Luce. They’ll both have the complete recipe on their websites. You can also check out everyone else’s semolina breads at the Tuesdays With Dorie website

Tropical Storm Baking: Refrigerator Potato bread

Tropical Storm Debby finally reached land late yesterday evening after churning in the Gulf of Mexico for 3 days, sending lots of wind and rain our way. The tides were extremely high, and that causes street flooding, which means that you don’t go anywhere unless you absolutely have to. So, the kids have not been going to camp. Dorothy was supposed to start a week of Comedy and Clowning Camp and the boys school converts into camp for the summer, so they’ve missed two days of that.For most of yesterday, the sun was shining, but the winds were still up, and the tides were really high. The storm moved incredibly slowly, it just sat there, sending bands of rain and wind (and tornados) out to our area.

This was taken on Sunday, when our dock was still in ‘good’ condition. the waves and high tide knocked David’s sunfish off the dock, and he hopped in to get it back.IMG_0523
The boat is (incredibly) still on the dock, but we’ve lost most of the planks–except for the ones the boat is sitting on. We’ve also lost the entire end platform of the dock. What’s left is a sad, sad carcas of a dock.IMG_0561

So, yesterday was the third day that we haven’t left the house. David went to work Monday and Tuesday. He left the house at about 1am on monday morning at low tide and slept the rest of the night at his office and worked all day. Monday evening he parked about a mile away from the house and walked in. Tuesday morning he walked back to the car and drove to work. Thankfully he was able to drive in last night. He grabbed some fresh fruit and milk from the hospital cafeteria for us on his way out yesterday. The kids–in all of their boredom–are eating us out of house and home.

Which brings me to this bread. We’re almost out of bread that I had (thankfully) stockpiled in the freezer when it was BOGO at Publix, and since nobody seems to know how much longer this storm will be with us, I decided to bake some bread today. I’ve always considered baking a good stormy day activity. Whenever we had snowstorms up north, I always made sure to have ingredients to bake with, and just the other day, Dorothy learned the principles of measurement when we made snickerdoodles on  Sunday.

Today my sous chef was Reid. The other two were making him crazy, so he came over to help me man the Kitchenaid.IMG_0553
This recipe comes from James Beard’s Beard on Bread. I’ve made a few recipes from this book before. It came out in 1973, and includes lots of drawings and in-depth directions.

It came together fairly quickly and easily, once I boiled the potatoes and mashed them up. The potato water melted the butter until there were only a few bits left, and they encorporated into the dough without any difficulty. I let it rise in the refrigerator for about 6 hours. When it emerged I kneaded it into a silky and resilient dough.IMG_0555
I shaped it into two loaves and put them into pans. I just got these, and perhaps I should have used all three. They started out like this:IMG_0557
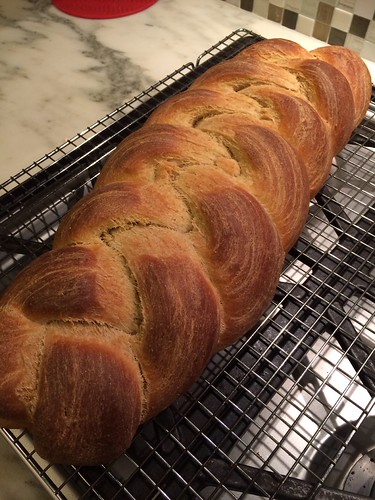
and after a long rise in my proofer (microwave with the door cracked open) they ended up like this:IMG_0558
Whoops! I’m sorry I don’t have a picture of what ended up hanging off the loaf. It was embarrassing. But delicious. I cut off the overhang last night to taste the bread. So, so, so good.

I like this bread, it was easy to put together, and required very little in the way of attention. And its delicious. Next time I’ll make 3 loaves

Refrigerator Potato Bread
Makes 1 round loaf or 2 or 3 regular loaves-depending on the size of your pans

1 package active dry yeast
1/2 cup plus 1 Tablespoon sugar
1/2 cup warm water
1 cup warm milk or potato water
(the water from cooking the potatoes–this is what I used)
1 1/2 sticks butter, softened in the milk or potato water
1 1/2 tablespoons salt
2 eggs
1 cup mashed potatoes
(he instructs that instant potatoes can be used, but why would you do that?)
6 cups (approx) all purpose flour

Dissolve yeast and tablespoon of sugar in the warm water in your mixing bowl. When the yeast is active, add the warm milk or potato water, butter, sugar, salt and eggs and blend thoroughly. Then add the mashed potatoes and stir again.

Add the flour, 1 cup at a time beating well after each addition, to make a throroughly stiff dough. You may need more or less than 6 cups, depending on the conditions where you are. Today I needed more than 6 cups.

Knead (either in your kitchenaid or on a floured surface) until it is smooth and elastic

Shape into a ball, and place in oiled or buttered bowl and cover with saran wrap. Place in refrigerator and let rise overnight.

remove from refrigerator, punch down and turn out onto floured surface. let rest for 5 minutes and then knead vigorously for 4 or 5 minutes. Let rest again

Shape into two loaves and place into buttered 9x5x3 baking tins. Or form into a ball and place it in a well buttered 9 inch pie plate.

Let the dough rise until doubled in bulk (may take as long as 4 hours because of the long refrigeration)

bake at 375 for 40-45 minutes. You may want to remove the bread from its baking tin and bake for the last few minutes on the rack to crisp the crust.

Tuesdays with Dorie: Oasis Naan (and Chana Masala)

This week’s assignment was to make Oasis Naan. An Indian flatbread topped with scallions, cumin seeds and coarse salt. The recipe is found on page 149 in the book.

You start by making the dough for ‘Oasis Naan’ Which is the same bread, with a different topping. It wasn’t difficult to make. I started with 2 1/2 cups of water and some yeast. I waited until the yeast came back to life and then started adding flour. I stirred, and stirred, and stirred, and added lots more flour. The recipe calls for 5-6 cups of flour, but it took almost 7 cups until the dough wasn’t sticking to my hands or my counter. So, there was a lot of dough. I stashed it in the fridge to rise all day since this was to be for dinner, and we would be at the pool all day. I knew I wouldn’t have time to put it together when we got home in the afternoon.

Since this is an Indian bread, I decided to make an Indian dish to go along with it. Indian food is not something I cook a lot of, and didn’t know where to find a good recipe. Steph was kind enough to point me to a recipe for Chana Masala from Smitten Kitchen. Deb’s recipes never dissapoint, and this one didn’t either. I had to buy some new spices and replace some that had run out, but it didn’t require anything ‘odd’ and the hardest part of the recipe was measuring all the spices. So, it wasn’t too taxing.

I took the Naan dough out of the fridge when we got home from the pool. I showered and started making the Chana Masala and heated up the oven for the naan. The masala was an easy, satisfying one pot dinner. It was fun to make becuase I got to use my new (sort of, but not really) blender as a spice grinder.
photo
I’ve never ground spices before. But it turns out that my  blender with a mason jar instead of the big blender bowl works perfectly as a spice grinder. Also great for smoothies and breakfast shakes!

I rolled and sprinkled and pricked the dough
photo
Pricking was very important. if you don’t dock the dough (pricking it with the tines of a fork or otherwise putting lots of holes in it) it will puff up like a pita bread. I forgot to dock one that went into the oven, and it got very puffy. I didn’t mind….it was still tasty. It just wasn’t flat. Whenever I make something that has to be baked on the baking stone, I roll/press it out onto parchment paper. I don’t own a baking peel, and the parchment lets me get it into the oven in one piece, and it pops right off the paper once its out of the oven. Works like a charm.

The bread was delicious, and totally addictive.
photo
we ate a fair amount of it while baking the rest of the dough. I got to use my house-made sea salt in the topping.

And it was delicious with the Chana Masala and some rice.
photo
If you want to see some more versions of this recipe you can start at Maggie’s blog, or Phyl’s blog. They’ll be posting the recipe if you care to try to make this yourself. And if you want to see even MORE versions of naan, visit the Tuesdays with Dorie website for the LYL (Leave Your Link) post.  There are always lots of beautiful posts about the baking adventure.

Tuesdays With Dorie: Sticky Buns (and Brioche)

I didn’t take very many pictures for this week’s recipe. In fact, I only took one….for the finished product. Our assignment this time was to make Pecan Sticky Buns (recipe on page 190.) But first, we had to make Brioche (recipe on page 43)

The brioche wasn’t difficult, but it was time consuming. First we had to make a sponge, and that had to sit for 40 minutes, then the dough, and that had to rise for 2 hours, and then overnight in the fridge. But the thing about this dough that I really didn’t like was the fact that the recipe called for  1 1/2 sticks of butter to be added to the dough. It only had 3 1/2 cups of flour, so we’re not talking about a huge amount of dough here….so it was intended to be VERY buttery. I cut it down to just one stick, I just didn’t have the heart (pun intended) to encorporate that much butter into the dough. As it was, I had to add much more flour into it because the butter was making it so sticky. Only once the dough was finished having its overnight rest in the fridge was it ready to be formed into the sticky buns.

And we had to add yet more butter to the dough. The recipe instructs us to roll and fold the dough as for puff pastry twice, so that we get layers of butter in the dough, thereby making these the “ne plus ultra of sticky bundom.” I had already decided to cut the recipe in half, and turn the balance into just plain brioche. So I divided my dough in half and only used about 2 tablespoons of butter (the recipe calls for 3/4 of a stick per 1/2 of the dough) to ‘laminate’ the dough. And then it rested in the fridge for a while. When I was good and ready, I rolled it out, and brushed on an egg wash, spread some cinnamon/sugar and nuts over it, and rolled it up. Into the freezer it went.

And it stayed in the freezer until this afternoon. I trimmed off the ends and baked them up with some (more) butter and brown sugar in two individual muffin cups. They came out looking beautiful.
photo
But they were so sweet, they made my teeth hurt. I’m looking forward to reading how other people dealt with the recipe and perhaps find some modifications for when I bake off the rest of them this weekend for brunch

But, here’s the thing. I baked Challah last week using the recipe on page 93. The recipe is suprisingly similar to the brioche. It has more milk, less butter, and makes more dough. I can’t tell you how much more I liked it than the brioche. The dough is so easy to work with, and made a beautiful challah. I brought it to a potluck dinner and the best compliment I heard was “it looks like it came from a deli, but I bet you made it”

So, I’m not planning on making this brioche again, and sticky buns don’t exactly fit into my life very often, but the challah recipe is definitely a keeper. Lynn and Nicole are the hosts for this week. They’ll have the recipe on their blogs, in case you have any desire to try it after my glowing review. As always, there will be a LYL (leave your link) post on the Tuesdays With Dorie website. I know I’ll be curious to see how everyone else liked this recipe.